 Click any image for an enlarged view.
You can see that I have not really organized anything in these folders. The first thing I'll do is rename the photo folder, so that the surname in capital letters really stands out. I right-click on the folder icon and choose Rename:

Then I retype the surname in all caps:
 Taking a look inside this folder shows eight photos, one of which is a duplicate. Here's the Thumbnail view:

The List view currently doesn't do anything to help me analyze or organize these photos:

The first thing I'm going to do is eliminate one of the photos of my great-grandparents because it's a duplicate, and also because it's a scanned image of a color photocopy. It used to be the only copy I had. Then my dad sent me a .jpg file, which is what you see here. This year, I actually got an original print of my own from my grandparents' estate, and I need to scan the original into a .tif file (writing this on my To Scan list for Scanfest right now).
Right now, that photo is named "Holst, Alfred Henry & Nellie Concidine". I am going to make a folder in which to put every photo of Nellie that I have. There are two here in CONCIDINE Photos, this one and the Higby Family Reunion photo. I know I have a couple more, but they are not digitized yet (making more notes in my To Scan list). From the toolbar menu, I choose File, then New, then Folder:

A new folder is created, and I right-click on it and chose Rename. Here it is:

To move the photo of Alfred and Nellie, I left-click on it, then hold the mouse button down while I drag the photo to the folder and then lift the button. You can see that the photo is now in the folder:
 I open the folder to rename the photo file using a system I came up with adapting Ms. Nuehring's system for digital files. I have decided to use the date, then the first and last names of each person as they appear in the photo from left to right, using the woman's maiden name and her current married surname. I debated whether to put surnames in capitals in photo file names, and decided against it. It makes it too difficult to read, especially when there are several people in a photo. I am limiting naming individuals in photo files to about five or six people. If there are more than six people in a photograph, I'll give it a group name and then identify the individuals in the Properties section of the file, or in a Notepad file of the same name (more on that later):
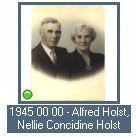 I know this photo was taken for Alfred and Nellie's 40th anniversary, and they were married in 1905. I don't have further information on the date, however, so I've added two sets of double zeros. If this photograph's date could only be identified by a vague date, say "circa 1940," I would list it as "1940 circa - Alfred Holst, Nellie Concidine Holst". That way, the files will still line up in date order when I view them in List view. Naming it as "Circa 1940" or "c. 1940" would put this at the end of the list of photos, because Windows Explorer orders numbers first, and then letters. If I had any other photos of Nellie taken after this date, then the photos would be out of date order; so again, I would put the word "circa" after the date.
Now that I've relabeled the photo, I'll add Properties information. This is something that will be used more for my photo files than my document files. In my document files, I only used Properties to identify the date and website in which I viewed and downloaded the document. First I right-click on the photo and choose Properties:
 Next, choose the Summary tab (you won't have a Carbonite tab unless you have this great backup system downloaded to your computer):

If you get this window instead of the one shown above, chose Simple:


Title: 1945 00 00 - Alfred Holst, Nellie Concidine Holst
I just copy the name I've already given this photo.
Subject: HOLST Alfred Henry, CONCIDINE Nellie May, anniversary portrait
I write out their full names, as they appear in the photo from left to right, and add a descriptive phrase.
Author: unknown - possibly Versluis Photography - Michigan, Ottawa, Coopersville
Photographer's name and location photo was taken come next.
Keywords: formal, anniversary, Alfred, Holst, Nellie, Concidine
I list whether the photo is formal or casual, then repeat any descriptive words I've used in the Subject line. I also enter first and last names only of those in the photo. I only do this with photos that don't have a lot of people in them.
Comments: Original in the possession of Bryan Robbins, [ADDRESS FOR PRIVATE USE,] 2008.
Here's where I put the contact information for the owner of the photo. I actually put the address in, instead of the "address for private use" phrase.
This photo will get copied into Alfred's own photo folder in the HOLST Photos folder.
Things are a little different for large group photos. I can't put that much description in any of the Properties fields, because I'm limited on the amount of text I can use. Here's what I did for the Higby family reunion photo. I named it "1906 00 00 Higby Brothers Reunion." Then I put in the following information in the Properties fields:
Title: 1906 00 00 - Higby Brothers Reunion
Subject: HIGBY, family reunion
Author: unknown - probably Michigan, Kent County
Keywords: casual, family reunion, Higby, Holst, Concidine, Hefner, Keeney, Dupree
Comments: See notepad file of the same name for identifying information. Original in the possession of Donna Metcalfe [ADDRESS FOR PRIVATE USE,] 2005.
Note that I only used surnames in the Keywords field (no first names). Next, I created a Notepad (.txt) file and identified everyone in the photo with information I gleaned from an e-mail sent to me from the owner of the photo:
Because Nellie's father and three of her brothers appear in this family reunion photo, I make a folder for each of them and copy the photo and notepad files into each of their folders.

Then I retype the surname in all caps:
 Taking a look inside this folder shows eight photos, one of which is a duplicate. Here's the Thumbnail view:

The first thing I'm going to do is eliminate one of the photos of my great-grandparents because it's a duplicate, and also because it's a scanned image of a color photocopy. It used to be the only copy I had. Then my dad sent me a .jpg file, which is what you see here. This year, I actually got an original print of my own from my grandparents' estate, and I need to scan the original into a .tif file (writing this on my To Scan list for Scanfest right now).
Right now, that photo is named "Holst, Alfred Henry & Nellie Concidine". I am going to make a folder in which to put every photo of Nellie that I have. There are two here in CONCIDINE Photos, this one and the Higby Family Reunion photo. I know I have a couple more, but they are not digitized yet (making more notes in my To Scan list). From the toolbar menu, I choose File, then New, then Folder:


 I open the folder to rename the photo file using a system I came up with adapting Ms. Nuehring's system for digital files. I have decided to use the date, then the first and last names of each person as they appear in the photo from left to right, using the woman's maiden name and her current married surname. I debated whether to put surnames in capitals in photo file names, and decided against it. It makes it too difficult to read, especially when there are several people in a photo. I am limiting naming individuals in photo files to about five or six people. If there are more than six people in a photograph, I'll give it a group name and then identify the individuals in the Properties section of the file, or in a Notepad file of the same name (more on that later):
 I know this photo was taken for Alfred and Nellie's 40th anniversary, and they were married in 1905. I don't have further information on the date, however, so I've added two sets of double zeros. If this photograph's date could only be identified by a vague date, say "circa 1940," I would list it as "1940 circa - Alfred Holst, Nellie Concidine Holst". That way, the files will still line up in date order when I view them in List view. Naming it as "Circa 1940" or "c. 1940" would put this at the end of the list of photos, because Windows Explorer orders numbers first, and then letters. If I had any other photos of Nellie taken after this date, then the photos would be out of date order; so again, I would put the word "circa" after the date.
Now that I've relabeled the photo, I'll add Properties information. This is something that will be used more for my photo files than my document files. In my document files, I only used Properties to identify the date and website in which I viewed and downloaded the document. First I right-click on the photo and choose Properties:
 Next, choose the Summary tab (you won't have a Carbonite tab unless you have this great backup system downloaded to your computer):
If you get this window instead of the one shown above, chose Simple:

Here's where I fill in the details:

I just copy the name I've already given this photo.
Subject: HOLST Alfred Henry, CONCIDINE Nellie May, anniversary portrait
I write out their full names, as they appear in the photo from left to right, and add a descriptive phrase.
Author: unknown - possibly Versluis Photography - Michigan, Ottawa, Coopersville
Photographer's name and location photo was taken come next.
Keywords: formal, anniversary, Alfred, Holst, Nellie, Concidine
I list whether the photo is formal or casual, then repeat any descriptive words I've used in the Subject line. I also enter first and last names only of those in the photo. I only do this with photos that don't have a lot of people in them.
Comments: Original in the possession of Bryan Robbins, [ADDRESS FOR PRIVATE USE,] 2008.
Here's where I put the contact information for the owner of the photo. I actually put the address in, instead of the "address for private use" phrase.
This photo will get copied into Alfred's own photo folder in the HOLST Photos folder.
---
Things are a little different for large group photos. I can't put that much description in any of the Properties fields, because I'm limited on the amount of text I can use. Here's what I did for the Higby family reunion photo. I named it "1906 00 00 Higby Brothers Reunion." Then I put in the following information in the Properties fields:
Title: 1906 00 00 - Higby Brothers Reunion
Subject: HIGBY, family reunion
Author: unknown - probably Michigan, Kent County
Keywords: casual, family reunion, Higby, Holst, Concidine, Hefner, Keeney, Dupree
Comments: See notepad file of the same name for identifying information. Original in the possession of Donna Metcalfe [ADDRESS FOR PRIVATE USE,] 2005.
Note that I only used surnames in the Keywords field (no first names). Next, I created a Notepad (.txt) file and identified everyone in the photo with information I gleaned from an e-mail sent to me from the owner of the photo:
HIGBY Brothers Family Reunion
1906
Probably taken in Kent County, Michigan
Back row, left to right:
HIGBY Lafayette C
[--?--] Anna Marie HIGBY - 2nd wife of HIGBY Lafayette C
CONCIDINE John - widower of HIGBY Anna M
HIGBY Albert
[--?--] Esther - wife of HIGBY Albert
HOLST Alfred Henry - son-in-law of CONCIDINE John
CONCIDINE Nellie May HOLST - daughter of CONCIDINE John
HEFNER Orpha HIGBY - wife of HIGBY Frank M
HIGBY Frank M
DUPREE Mary L HIGBY - 2nd wife of HIGBY Carey Willis
HIGBY Dorothy - daugher of HIGBY Carey Willis
HIGBY Carey Willis
Etc., etc.
Because Nellie's father and three of her brothers appear in this family reunion photo, I make a folder for each of them and copy the photo and notepad files into each of their folders.
---
For gravestone photo files, I name them with the date they were photographed, which always places them at the end of the list of photos for that individual. Here are the Properties for a photo taken of the gravestone of Nellie's father, John Dennis CONCIDINE:
Title: 2005 00 00 - Gravestone of John Dennis Concidine
Subject: CONCIDINE John Dennis, gravestone
Author: Donna Metcalfe - Michigan, Kent, Byron Twp, Winchester Cemetery
Keywords: John, Concidine, gravestone, Winchester Cemetery
Comments: Original in the possession of Donna Metcalfe, [ADDRESS FOR PRIVATE USE,] 2005.
Is this a perfect system? I don't know, but it is working well for me. Here is what the inside of the CONCIDINE Photos folder now looks like:

And here is Nellie's photo folder in Thumbnail and List views:


Everything is neat and tidy and easy to find. The keywords allow me to do a search over all my computer files and find the photographs I'm looking for. The file names ensure that I can find all the photographs for that person in one location, listed in date order. The folder names help me find all the photographs for all individuals with that surname in one location, listed in alpha order. Yes, it will take me time to rename and tag all these photos, but I can tell you that it's making it very easy to know how to name, file, and organize the new photographs that have recently been sent my way.
I hope this inspires you to do something similar with your ancestral photographs!
I hope this inspires you to do something similar with your ancestral photographs!
In this series:
Tuesday's Tip: Organizing Your Digital Files
Update on Tuesday's Tip: Organizing Your Digital Files
Tuesday's Tip: Organizing Digital Research Notes, Emails, and Reports

7 comments:
Thanks Miriam for your excellent tutorial on organizing digital photos.
These last several posts have been a great Christmas gift for me! Thanks!
Thanks Miriam,
Your recent posts have me re-thinking my file organizations. One of these days I'll settle on a particular method.
You have been so helpful!
Big Happy Holidays to you!
Peace,
"Guided by the Ancestors"
Hi Miriam,
Does the assigning of keywords and other information to the images work the same way with Vista? Also, if this is done to an image in XP, it that information carried over when opened in Vista and on the Mac?
Because I only have Windows XP, I can't experiment and tell you a confident answer. I am going to guess that if you upgraded to Windows Vista, it would work.
Two great techie minds that could answer these questions are Thomas and Denise.
Thank you all for stopping by. Merry Christmas!
Miriam,
You taught me something about properties and key words on photos that I didn't know.
I have been naming my photos like this: 20081231 and name(s) of person(s). I think I'll stick with that date format but may change the subjects names.
Happy New Year!
See you on Facebook!
Tim Cox
Post a Comment